Showing posts with label Projects. Show all posts
October 23, 2012
September 10, 2012
Project #14: Dryer Sheet Flowers
Posted on 11:45 PM
Make these flower embellishments from used dryer sheets and use them on your projects!
Supplies:
1. Stamps:
Script clear stamp (Fancy Pants Designs Bella Brush)
2. Ink Pads
Memento Tuxedo Black
Dye Ink in colors of your choice
3. Others:
used Dryer Sheets
Brads
Die-Cut and a die-cut Machine (optional) - you can also hand cut!
Tutorial coming soon!
1. Stamps:
Script clear stamp (Fancy Pants Designs Bella Brush)
2. Ink Pads
Memento Tuxedo Black
Dye Ink in colors of your choice
3. Others:
used Dryer Sheets
Brads
Die-Cut and a die-cut Machine (optional) - you can also hand cut!
Tutorial coming soon!
August 29, 2012
Project #13: By the Sea Wall Decor
Posted on 1:13 PM
Supplies:
1. Stamp:
PO-B49 Starfish Border
2. Ink Pads (Imagine Crafts):
VersaMagic (Turquoise Gem, Ocean Depth and Aegean Blue)
VersaMark
3. Others:
Decorative Napkin
Cardstock
Glue Stick
Platinum Ultra Thick Embossing Enamel (Ranger)
Decorative Border Punch and Corner Punch (Martha Stewart)
Stapler
Ribbon
How-To coming in the next post...
1. Stamp:
PO-B49 Starfish Border
2. Ink Pads (Imagine Crafts):
VersaMagic (Turquoise Gem, Ocean Depth and Aegean Blue)
VersaMark
3. Others:
Decorative Napkin
Cardstock
Glue Stick
Platinum Ultra Thick Embossing Enamel (Ranger)
Decorative Border Punch and Corner Punch (Martha Stewart)
Stapler
Ribbon
How-To coming in the next post...
July 25, 2012
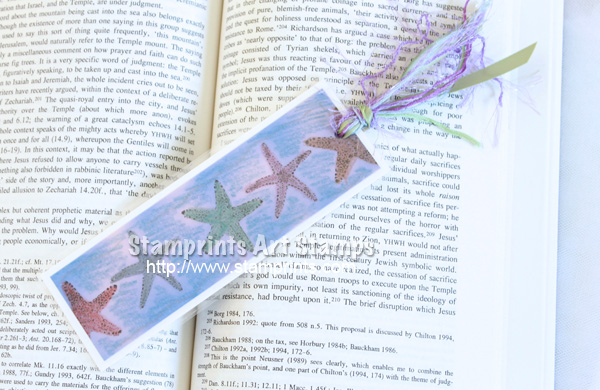
Project #12: Stamped Bookmark
Posted on 7:57 PM
Supplies:
1. Stamps:
PO-B46 Starfish Small
PO-B48 Starfish 2
2. Ink Pad:
Memento Tuxedo Black (Imagine Crafts)
3. Others:
White and Blue Cardstock
Metallic Crayons (Faber Castell)
Ribbon
Fibers
Laminating Machine and pocket (Purple Cows)
Corner Punch
Hole Punch
How-to:
1. Stamp the Starfish in Black on the blue cardstock.
2. Color the images and background with metallic crayons.
3. Layer panel on white cardstock.
Trim and place laminating pocket to size and run the bookmark through the laminating machine.
Round the corners and punch a hole for the ribbon/fibers.
Add coordinating ribbon and fibers.
4. Not sure if you can see it, but the hot laminating machine will melt the crayon. The lighter the color, the better! Then you'll be able to see the stamped image better.
And I actually used the heat embossing gun before I laminated the bookmark...that's why I got that lavender color around the starfish ('cause I "burned" the paper).
May 29, 2010
Project #11: Stamped Pendants
Posted on 3:32 PM


Supplies:
1. Stamps:
KI-A27S Klimt Symbols Set
Flourish (Fancy Pants Designs)
Sentiments (Inkadinkado)
2. Ink Pads:
Memento Tuxedo Black (Tsukineko)
VersaMark (Tsukineko)
3. Cardstock/Patterned Papers:
BasicGrey
Fancy Pants Designs
S.E.I.
4. Others:
Clear and Silver Embossing Powder
Glitter Glues
May 21, 2010
Project #10: Embossed Magnets
Posted on 6:06 PM

1. Stamps:
KI-A20 Klimt Swirls
Sentiment (Inkadinkado)
2. Ink Pads:
Memento Tuxedo Black (Tsukineko)
VersaMark Dazzle Frost
3. Others:
UTEE (Ultra Thick Embossing Enamel) by Ranger
Heat Gun
Stampboard
Silver Leafing Pen (Krylon)
Doesn't your fridge love some fancy magnets?
Try these using the supplies listed above.
All you have to do is:
1. Ink the Stampboard (or a piece of unfinished wood) with VersaMark and heat emboss with UTEE of your choice.
Repeat 1 or 2 more times.
2. While the last layer is still hot, stamp a image of your choice and press it down.
Leave the stamp until the UTEE cools down. Then, gently remove the rubber stamp.
3. Ink and stamp a sentiment.
4. With the silver leafing pen, paint the sides of the Stampboard for a finished look.
P.S. You may paint your Stampboard (or piece of unfinished wood) before you start the embossing process...depending on the pressure you use, your background might show up like in the copper magnet, which was painted green (magnet on the left).
April 24, 2010
Project #9: More Stamped Tags
Posted on 3:16 PM
These tags were cut using the Slice (Making Memories).
The images were colored with colored pencils and embellished with fibers/ribbon and glitter glues.

Supplies:
1. Stamps:
KI-A23 Klimt Butterfly
WS-A10 Butterfly
2. Ink Pad: Memento Tuxedo Black (Tsukineko)
3. Patterned Paper: S.E.I.
4. Others:
Fibers
Ribbon
Colored Pencils
Glitter Glues
The images were colored with colored pencils and embellished with fibers/ribbon and glitter glues.
Supplies:
1. Stamps:
KI-A23 Klimt Butterfly
WS-A10 Butterfly
2. Ink Pad: Memento Tuxedo Black (Tsukineko)
3. Patterned Paper: S.E.I.
4. Others:
Fibers
Ribbon
Colored Pencils
Glitter Glues
March 21, 2010
Project #8: Decoupage Easter Egg
Posted on 7:22 PM
Easter is around the corner!
Transform a ceramic egg with rubber stamps, ink pads and handmade paper!
Just stamp the handmade paper with inks of your choice.
Then, apply the stamped paper on the egg with ModPodge or gel medium!
Supplies:
1. Stamps:
PO-A03 Flower 8
2. Ink Pads:Memento Angel Pink (Tsukineko)
Memento New Sprout
3. Others:
Textured Handmade Paper
Gel Medium
Ceramic Bisque Egg
Transform a ceramic egg with rubber stamps, ink pads and handmade paper!
Just stamp the handmade paper with inks of your choice.
Then, apply the stamped paper on the egg with ModPodge or gel medium!
Supplies:
1. Stamps:
PO-A03 Flower 8
2. Ink Pads:Memento Angel Pink (Tsukineko)
Memento New Sprout
3. Others:
Textured Handmade Paper
Gel Medium
Ceramic Bisque Egg
February 26, 2010
Project #7: Think Outside the Box
Posted on 2:48 PM
Go through your stamp collection and find new ways to use them!
What looks just like a triangle (KI-A21 Klimt Triangle)...

...could also be flower petals or an asterisk...

...or a roof!

Other stamps used:
KI-A20 Klimt Swirls
KI-A26 Klimt Rectangle
Hero Arts
7gypsies
What looks just like a triangle (KI-A21 Klimt Triangle)...

...could also be flower petals or an asterisk...

...or a roof!

Other stamps used:
KI-A20 Klimt Swirls
KI-A26 Klimt Rectangle
Hero Arts
7gypsies
January 29, 2010
Project #6: Mini Valentine's Day Cards
Posted on 1:24 AM
Make Mini Valentine's Day Cards with our WS-A17 Heart stamp and the new Delta Series mini stamp set by BasicGrey.
These cards measure approximately 2.75" x 4".


The heart from BasicGrey fits perfectly in our Heart stamp.
And don't forget the envelopes!

Check out our Grey & White Mini Envelopes !
These cards measure approximately 2.75" x 4".


The heart from BasicGrey fits perfectly in our Heart stamp.
And don't forget the envelopes!

Check out our Grey & White Mini Envelopes !
October 31, 2009
Project #5: Easy Tags
Posted on 3:52 PM
For this project, you'll need
1. Stamps:
PO-A01 Black-Eyed Susan
PO-A03 Flower 8
Sentiment: Studio G
2. Ink Pads
Memento Tuxedo Black and Angel Pink
3. Circle/Round Scallop Punches or a die-cut machine
4. Ribbon
5. Hole Punch

We used a Slice Machine (Making Memories) to cut out the shapes.
Ink and stamp your chosen images on.
Punch a hole.
Add the ribbon and place the tags around the party favors or other gifts.

1. Stamps:
PO-A01 Black-Eyed Susan
PO-A03 Flower 8
Sentiment: Studio G
2. Ink Pads
Memento Tuxedo Black and Angel Pink
3. Circle/Round Scallop Punches or a die-cut machine
4. Ribbon
5. Hole Punch

We used a Slice Machine (Making Memories) to cut out the shapes.
Ink and stamp your chosen images on.
Punch a hole.
Add the ribbon and place the tags around the party favors or other gifts.

September 28, 2009
Project #4: Using Stamps in Scrapbook Layouts
Posted on 6:28 PM

Use rubber stamp images to add interest to your patterned papers.
In the layout above, we inked and stamped LS-B41 Maple Leaf in VersaMark (Tsukineko).
Then, heat emboss with different embossing powders.
August 26, 2009
Project #3: 3-D Embellishments
Posted on 11:02 AM
Use rubber stamps to create 3-D embellishments and give your cards the extra "pop"!
The card above uses the stamp QC-B52 Wild Tomato.
Stamp the flower on the striped patterned paper (pp) and heat emboss in Clear. Then, stamp it 3 times more on the pinkish pp and also heat emboss.
Cut the flowers out and layer them to form the full bloom.
The first and second flowers were adhered on with double-sided tape. Use foam tape to adhere the third flower.
The card below was created with 3 embossed flowers.
Stamp the flower from S.E.I. Mimosa Clear Stamps on light green cardstock, heat emboss and cut them out.
Adhere the left and the right flowers with double-sided tape. And use foam tape for the flower in the center.
The card above uses the stamp QC-B52 Wild Tomato.
Stamp the flower on the striped patterned paper (pp) and heat emboss in Clear. Then, stamp it 3 times more on the pinkish pp and also heat emboss.
Cut the flowers out and layer them to form the full bloom.
The first and second flowers were adhered on with double-sided tape. Use foam tape to adhere the third flower.
The card below was created with 3 embossed flowers.
Stamp the flower from S.E.I. Mimosa Clear Stamps on light green cardstock, heat emboss and cut them out.
Adhere the left and the right flowers with double-sided tape. And use foam tape for the flower in the center.
The sentiment (Studio G) was stamped on light green cardstock and layered on BasicGrey pp. Then, the panel was adhered with foam tape.
March 31, 2009
Project #2: Twinchies
Posted on 1:03 AM
Think of twinchies as "big sister" of inchies...
Twinchies are pieces of artwork in a 2"x2" canvas.
Here's a card using 2 twinchies:

Supplies:
1. Stamps:
From the Garden (Fancy Pants Designs)
2. Ink Pads:
Brilliance (Tsukineko)
VersaMagic (Tsukineko)
Memento Tuxedo Black
Memento Rich Cocoa
3. Patterned Paper:
BasicGrey
Fancy Pants Designs
4. Others:
Paper Flowers (Prima)
Glitter Glues
Foam Squares
Twinchies are pieces of artwork in a 2"x2" canvas.
Here's a card using 2 twinchies:

Supplies:
1. Stamps:
From the Garden (Fancy Pants Designs)
2. Ink Pads:
Brilliance (Tsukineko)
VersaMagic (Tsukineko)
Memento Tuxedo Black
Memento Rich Cocoa
3. Patterned Paper:
BasicGrey
Fancy Pants Designs
4. Others:
Paper Flowers (Prima)
Glitter Glues
Foam Squares
February 21, 2009
True Love Inchies Card
Posted on 11:53 AM

Supplies:
1. Stamps:
Klimt Inspired Collection (Klimt Triangle, Klimt Swirls, Klimt Star, Klimt Heart)
From the Garden (Fancy Pants Designs)
2. Ink Pads:
VersaMark (Tsukineko)
Brilliance Meditteranean Blue
VersaMagic Dew-Drops
3. Patterned Papers:
BasicGrey
Fancy Pants Designs
7gypsies
4. Others:
Copper Embossing Powder (Tsukineko)
Brads (7gypsies)
Glitter
Green Metallic Brush Pen (Pentel)
Silver Leafing Pen (Krylon)
Cuttlebug Machine
Flowers Die
Here's the detail for the flower:

We embellished the heart and flower center with glitter. Just use a fine-tip liquid glue to outline where you want the glitter and sprinkle glitter on.
February 16, 2009
Project #1: Inchies
Posted on 11:14 PM
Inchies are miniature pieces of art!
Trim 1" x 1" squares from cardstock, patterned paper, fabric or any other material and start creating!
Use them in cards, scrapbook layouts or other projects.
For these inchies, we stamped a piece of cardstock with several images from the Klimt Inspired Collection. Then, we trimmed it into 1" x 1" squares. These can be used as is to embellish a card or as background for other images.

These were stamped on patterned papers. Then, embellished with embossing powders, metallic pens, punch-out flowers and/or glitter glues.
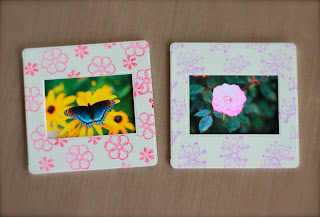
These stamps and/or stamp sets are perfect for inchies!
PO-A02 Small Black-Eyed Susan
The Daily Grind Stamp #1 (Fancy Pants Designs)
From the Garden (Fancy Pants Designs)
Trim 1" x 1" squares from cardstock, patterned paper, fabric or any other material and start creating!
Use them in cards, scrapbook layouts or other projects.
For these inchies, we stamped a piece of cardstock with several images from the Klimt Inspired Collection. Then, we trimmed it into 1" x 1" squares. These can be used as is to embellish a card or as background for other images.

These were stamped on patterned papers. Then, embellished with embossing powders, metallic pens, punch-out flowers and/or glitter glues.

These stamps and/or stamp sets are perfect for inchies!
PO-A02 Small Black-Eyed Susan
The Daily Grind Stamp #1 (Fancy Pants Designs)
From the Garden (Fancy Pants Designs)
Subscribe to:
Posts (Atom)